Monday, October 30, 2006
Workshop 5: Deciding on a theme for photography assessment
Our group chose a theme of transport and technology, the main reasons being that this topic covers a very broad area to approach from lots of angles. Looking at www.bigstockphoto.com, a large number of the top downloaded and most popular images are based around technology.
Some of those which were most effective include sharp close ups of computer technology, such as keyboard and mice. I looked at taking close up images of text on the screen from different angles.
Monday, October 23, 2006
Exploring Big Stock Photo
Today we explored www.bigstockphoto.com as it appears that it is some software that will play an important roll in our assessment for Creative Technologies. I signed up to www.bigstockphoto.com and we did the standard things such as read the info, tutorials, do the quiz at the end. Using this website one must adhere to stringent quality control rules before having their uploaded photographs accepted. The rules on what should be uploaded, and who should upload the image etc. were what was tested in the test at the end of the tutorial. Everybody passed the test because it was very easy.
Monday, October 16, 2006
Introduction to Adobe Photoshop II

In this session I eperimented with contrast, colour balance, hue & saturation, histogram, levels and curves. I attached some of the images I modified to this post. Some images in the examples were too dull colourwise and needed some added saturation, also colour balance was modified on some of them because on older photographs there was a yellowish tint.
Repairing broken images.
The following images were repaired using the Clone Tool, Dust & Scratch Filter, and Healing Brush.
Cloning/healing brush to repair these images:
First I actually had to rotate the image. Then I used mainly the healiong brush tool, set to a diameter of 10 pixels, on the black and white photograph. I fixed the cracks & tears in the old photo, although to start with I used an excessive brush size and created a lot of smudging.
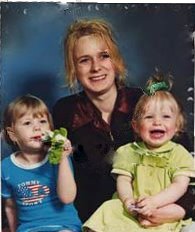
The third image showed a family portrait which appeared to have been spliced apart. I selected each of the parts of the image with the magnetic lasso tool, and rotated and moved them into place. Visible cracks between the sections remained, however these could be got rid of using the healing brush tool.
Monday, October 09, 2006
Introduction to Adobe Photoshop work
Today I had an introductory look into Adobe Photoshop, the image editing software, and learned a few new things about this program. I imported two images and attempted to incoporate them into the same layer. For this I used the magnetic lasso tool to select the parts of the image to splice into the original background layer. I added some effects to these sections so that the man who I merged into the background layer gave off a ghostly shimmering light and looked transparent.